ExecutorAgent
| Class Name | ExecutorAgent |
|---|---|
| Extends | Executor |
| Source | executor-agent.ts |
| Examples | executor-agent.spec.ts |
The ExecutorAgent module is designed to cover basically the same tasks as the Executor module. While the last one performs the transactions directly with an identity or account, that is given as inputOptions, the ExecutorAgent module wraps those transactions by submitting them to a smart agent.
The smart agent receives those transactions and performs them with its own identity or account, if a valid token has been passed to it alongside the transaction data. Tokens for transactions can be issued at the smart agent as well (a password is required for this).
Using the ExecutorAgent allows to delegate transactions to users that do not have their own blockchain identity or account. Delegating those transactions requires that smart agent user to be invited into the contract instead of the users, that will interact with the contract.
Users without identity or account are then interacting with the front-end the same way as regular users, but do not submit their transactions themselves, they make a REST request against a smart agent server. To prevent spamming and scamming, the users use tokens for their transactions. Tokens are basically like prepaid telephone card and allows to perform a limited set of functions for a limited amount of times. Tokens can only be created with a valid password.
Let’s say, we have created a DataContract, that contains three questions, that should be answered by someone without an own blockchain identity or account (think of a customer survey or something similar).
To allow that, first invite the corresponding smart agent identity or account into the contract. Smart agent identities or accounts for this should be known to the party, that wants to delegate transactions and their funds are maintained by this party, we’ll use an example address for this here.
For abbreviation we assume, we have the following values:
let dataContractInstance;                     // our data contract with the survey questions
let contractOwner;                            // 'we' - the contract creator and owner
let businessCenterDomain = 'testbc.evan';     // contracts business center
let smartAgentId;                             // account id of our smart agent
let password;                                 // password, for token generation
So let’s invite the smart agent to our contract:
await dataContract.inviteToContract(
  businessCenterDomain,
  dataContractInstance.options.address,
  contractOwner,
  smartAgentId,
);
Now with the smart agent being able to perform transactions, create a token for transaction delegation. We want the user to be able to:
- accept the invitation
- write three answers
- mark their state as “done”
const txToken = await executor.generateToken(
  password, [
  { contract: dataContractInstance, functionName: 'changeConsumerState', count: 2, },
  { contract: dataContractInstance, functionName: 'addListEntry', count: 3, },
]);
Allowing addListEntry three time is to allow them to write three answers. One of the changeConsumerState times is for accepting the contract, which is done by setting the own state to Active. The other one is for marking editing as done (setting the own state to Terminated).
The resulting token txToken is a string, that can be handed over to our users without an identity or account. This is usually done by sending them an email with a link, that contains the token and skips the login step for them and routes them directly to the contract, they should respond to.
Let’s switch sides. The next steps are performed in the front-end by a user without a blockchain identity or account, that has received the token.
To make transaction via a smart agent, create an instance of the ExecutorWallet and assign the token from before as token .
const executor = new ExecutorAgent({
  agentUrl
  config,
  eventHub,
  signer,
  web3
});
executor.token = txToken;
To use the ExecutorWallet instance created this way in your other modules, hand it over to their contstructor like instead of a normal Executor instance. Then use your modules, that have the ExeutorWallet instance like you would use them for making transactions with your own identity or account.
const surveyAnswer = {
  foo: 'sample',
  bar: 123,
};
await dataContract.addListEntries(dataContractInstance, ['surveyAnswers'], [sampleValue], smartAgentId);
Note, that the last sample uses the smartAgentId as the performing identity or account. Because transactions are estimated before being executed and in some cases the underlying modules require an “active” identity or account, that is used as the users identity, this has to match the smart agents identity or account. The smart agent identity or account is passed alongside the token via the link in the email for users without blockchain accounts. References, that would point to a users identity or account have to be replaced with this smart agent identity or account.
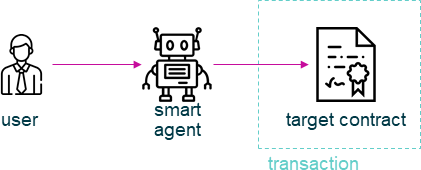
transaction flow in agent based transactions
constructor
new ExecutorAgent(options);
Creates a new ExecutorAgent instance.
The ExecutorAgent allows to pass the defaultOptions property to its constructor. This property contains options for transactions and calls, that will be used if no other properties are provided in calls/transactions. Explicitly passed options always overwrite default options.
Parameters
options-ExecutorAgentOptions: options for ServiceContract constructor.config-any: configuration object for the executor instancedefaultOptions-any(optional): default options for web3 transactions/callseventHub-EventHub:EventHubinstancesigner-SignerInterface:SignerInterfaceinstanceweb3-Web3:Web3instanceagentUrl-string(optional): agent url, including protocol, host and port, defaults to'http://localhost:8080'log-Function(optional): function to use for logging:(message, level) => {...}logLevel-LogLevel(optional): messages with this level will be logged withloglogLog-LogLogInterface(optional): container for collecting log messageslogLogLevel-LogLevel(optional): messages with this level will be pushed tologLog
Returns
ExecutorAgent instance
init
executor.init(name);
initialize executor
Parameters
options-any: object with the property “eventHub” (of the type EventHub)eventHub-EventHub: The initialized EventHub Module.
Returns
void.
executeContractCall
executor.executeContractCall(contract, functionName, ...args);
run the given call from contract
this is done as a rest call against the smart agent
a token is not required for performing calls
Parameters
contract-any: the target contractfunctionName-string: name of the contract function to call...args-any[]: optional array of arguments for contract call. if last arguments is {Object}, it is used as the options parameter
Returns
Promise resolves to any: contract calls result.
Example
const greetingMessage = await runtime.executor.executeContractCall(
  contract,                               // web3.js contract instance
  'greet'                                 // function name
);
executeContractTransaction
executor.executeContractTransaction(contract, functionName, inputOptions, ...functionArguments);
execute a transaction against the blockchain, handle gas exceeded and return values from contract function
this is done as a rest call against the smart agent
transactions, that transfer EVEs to a target identity or account, will be rejected
this requires a valid token issued with generateToken beforehand, tokens can be set at the executor with:
executor.token = someToken;
Parameters
contract-any: contract instancefunctionName-string: name of the contract function to callinputOptions-any: options objectfrom-string(optional): The address the call “transaction” should be made from.gas-number(optional): The amount of gas provided with the transaction.event-string(optional): The event to wait for a result of the transaction,getEventResult-function(optional): callback function which will be called when the event is triggered.eventTimeout-number(optional): timeout (in ms) to wait for a event result before the transaction is marked as errorestimate-boolean(optional): Should the amount of gas be estimated for the transaction (overwritesgasparameter)force-string(optional): Forces the transaction to be executed. Ignores estimation errorsautoGas-number(optional): enables autoGas 1.1 ==> adds 10% to estimated gas costs. value capped to current block.
...functionArguments-any[]: optional arguments to pass to contract transaction
Returns
Promise resolves to: no result (if no event to watch was given), the event (if event but no getEventResult was given), the value returned by getEventResult(eventObject).
Because an estimation is performed, even if a fixed gas cost has been set, failing transactions are rejected before being executed. This protects users from executing transactions, that consume all provided gas and fail, which is usually not intended, especially if a large amount of gas has been provided. To prevent this behavior for any reason, add a force: true to the options, though it is not advised to do so.
To allow to retrieve the result of a transaction, events can be used to receive values from a transaction. If an event is provided, the transaction will only be fulfilled, if the event is triggered. To use this option, the executor needs to have the eventHub property has to be set. Transactions, that contain event related options and are passed to an executor without an eventHub will be rejected immediately.
Example
const accountId = '0x...';
const greetingMessage = await runtime.executor.executeContractTransaction(
  contract,                               // web3.js contract instance
  'setData',                              // function name
  { from: accountId, },                   // perform transaction with this account
  123,                                    // arguments after the options are passed to the contract
);
Provided gas is estimated automatically with a fault tolerance of 10% and then used as gas limit in the transaction. For a different behavior, set autoGas in the transaction options:
const greetingMessage = await runtime.executor.executeContractTransaction(
  contract,                               // web3.js contract instance
  'setData',                              // function name
  { from: accountId, autoGas: 1.05, },    // 5% fault tolerance
  123,                                    // arguments after the options are passed to the contract
);
or set a fixed gas limit:
const greetingMessage = await runtime.executor.executeContractTransaction(
  contract,                               // web3.js contract instance
  'setData',                              // function name
  { from: accountId, gas: 100000, },      // fixed gas limit
  123,                                    // arguments after the options are passed to the contract
);
Using events for getting return values:
const contractId = await runtime.executor.executeContractTransaction(
  factory,
  'createContract', {
    from: accountId,
    autoGas: 1.1,
    event: { target: 'FactoryInterface', eventName: 'ContractCreated', },
    getEventResult: (event, args) => args.newAddress,
  },
);
executeSend
executor.executeSend(options);
creating contracts directly is not supported by the walled based executor, use a regular Executor for such tasks
createContract
executor.createContract(contractName, functionArguments, options);
creates a contract by contstructing creation transaction and signing it with private key of options.from
this is done as a rest call against the smart agent
transactions, that transfer EVEs to a target identity or account, will be rejected
this requires a valid token issued with generateToken beforehand, tokens can be set at the executor with:
executor.token = someToken;
Parameters
contractName-string: contract name (must be available withing contract loader module)functionArguments-any[]: arguments for contract creation, pass empty Array if no argumentsoptions-any: options objectfrom-string: The address the call “transaction” should be made from.gas-number: Provided gas amout for contract creation.
Returns
Promise resolves to any: new contract.
Example
const newContractAddress = await runtime.executor.createContract(
  'Greeter',                              // contract name
  ['I am a demo greeter! :3'],            // constructor arguments
  { from: '0x...', gas: 100000, },        // gas has to be provided with a fixed value
);
generateToken
executor.generateToken(password, functions);
generate a new token for transactions (or contract creations)
this generates a new token for the given functions, this token can be used for each requested function (either only once or multiple times, if a count > 1 has been requested)
Parameters
password-string: password for token creationfunctions-any[]: array of function signatures as abi objects
Returns
Promise returns string: token for given transactions
Example
Tokens can be created for transactions by passing the contract and the function name to it:
const txToken = await executor.generateToken(
  password, [{ contract: contract, functionName: 'addListEntry', }]);
When the token should be able to perform those transactions multiple times, pass a count alongside:
const txToken = await executor.generateToken(
  password, [{ contract: contract, functionName: 'addListEntry', count: 3, }]);
When wanting to perform a contract creation without a factory contract, this contract has to be known to the smart agent. Then the contract name can be passed as ‘signature’:
cosnt ccToken = await executor.generateToken(
  password, [{ signature: 'Owned', }]);